Most likely if you are using Revit, you have switch from, or still use AutoCad. At first, it may seem frustrating to deal with AutoCad files in Revit, but with a few helpful tips, they can be really friendly. The first thing you need to decide is how are you going to use this file? Is it a detail? Is it a file from the surveyor? Do I want to see it in 1 view or multiple views?
When you import the file, you have a slew of options.
Link File- (only if the file will change)
Current View Only
Colors (will you see this file in the final product- if so, make black and white)
Layers
Positioning
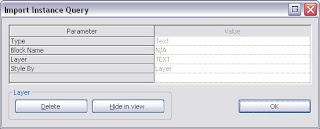
Once you get the file in how you want it and how it will work for your application there is a really easy way to manage you layer without going to Visibility Graphics. Click on the imported file and select QUERY from the toolbar that pops up. This will allow you to click on a line, and Revit will tell you what the layer is called. Then you can choose to delete it, or hide it, or close the dialog box and select a different layer. This is a VERY FAST way of MANAGING YOU AUTOCAD FILES.
Do not explode your AutoCad files unless you cannot do what you need to do this way. When you explode an AutoCad file, you get stuck with dozens, or even hundreds of linetypes that will be added to your project making life miserable.
No comments:
Post a Comment